Use the aggregate transform in SSIS to out perform T-SQL!

I know I got your attention with that title. If you speak to any experienced BI Developer you will always be informed that you should perform all of your aggregations in T-SQL where possible in the source and not using the SSIS components. To this point I agree, well most of the time anyway. There are however times when using SSIS will out perform T-SQL if all the stars align. Let me explain.

Recently I was using a CTE and the row_number function in T-SQL to bring back only distinct customers from a list of transactions. This result set was then used to insert inferred members into the customer dimension, if that customer did not yet exist of course. Once the result set returned the list of distinct customers we performed a lookup against the customer dimension and we loaded the non matching customers into the customer dimension.

Now let me note, the T-SQL query honestly wasn’t that bad, it was only taking around 3 minutes to run. The bigger problem here was that the query was using temp db and this was causing locking issues with a more advanced design pattern (Partition switch) that the SQL Server Engine could not resolve.

So, we turned to good ole SSIS to help us out.

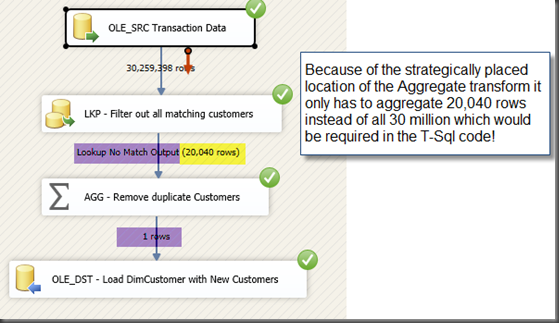
  • First, bring all records from the source exactly as they were, all 30 million transactions.
  • Next, perform the lookup to the customer dimension and redirect non matching rows to aggregate transform.
  • Finally, use the aggregate transform to group the new customers and then load the distinct values into the customer dimension.

image

This works because we filter out all the existing customers before doing the aggregation in SSIS and therefore only small percentage of the records require aggregation. The data flow task to load inferred members runs in approximately 80 seconds, where as the original T-SQL query alone was taking over 3 minutes.

Thanks for looking!
Using cache transforms in SSIS to improve Performance (Part 1)

There are quite a few different scenarios for when cache transforms can be used to improve usability and performance inside SSIS. In this post I am going to quickly outline a scenario where cache connection managers can greatly improve performance when loading a fact table.

During the pre-execution phase of package execution SSIS “caches” the lookups inside your package into memory, unfortunately if you are using OLE DB connections in your Data Flow Task this caching happens in a serialized format (one after the other). Typically this isn’t a big deal because you may only have one or two large dimension lookups and all others are very small in size and very fast. But what if this isn’t the case? What if you have 5, 6, 7, or more dimensions all with millions of records that you must cache before the package begins execution? Here is how we can get around this little issue.

image

  • Inside the data flow tasks we will set each source to point to our cache transforms. Each one of the Cache Transforms will require a connection manager to store the data.

image

  • Below is a screenshot of the connection managers created by the Cache transforms:

image

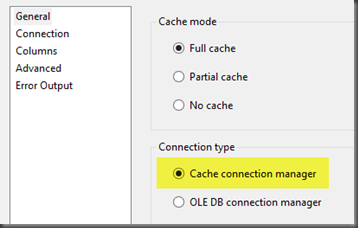
  • Now that the cache connection managers have been set up, you will need to point each of your lookup transforms to the “Cache Connection manager” instead of the default of  OLE DB connection manager.

image

  • Now to the last step. Now click on the connection tab and point to the cache connection manager that stores the information for your lookup:

image

  • All other configuration steps are the same as normal. Thanks for looking, and hope this helped.

How to get the column with the max date or number in SSIS! (The Easy Way)

Recently when loading a snapshot fact table I was required to populate one of the columns with the the most recent revenue generating activity from all activities. The catch? This information was stored in about 12 different fact tables. I was already storing the last revenue generating activity for each fact table in it’s own individual column, but now I needed to figure out how to take the greatest date from all 12 columns and populate the last revenue generating activity across all fact tables. Make sense? Fear not, I have pictures!

To simulate the problem lets pretend that we run an internet based company and we have a separate fact table for item purchases, gift cards purchases, and services. The first screenshot below shows how the last revenue generated activity can differ for each customer.

image

This screenshot is the desired result. Notice how the new column has taken the MAX date from the correct column for each customer!

image

So how did we get accomplish this goal in less than a minute?? Awesome question, hold on, we are almost there.

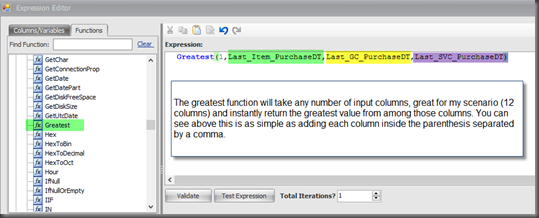
I decided to take advantage of one of the 194 functions offered in the Task Factory Advanced Derived Column transform (Greatest). Oh and this works for more than just dates.

The two screenshots below demonstrate just how easy it is to set this up. Thanks and enjoy!

image

image


Dynamically set secure FTP connection string and password

Note: This walkthrough is specific to the Secure FTP component available in TaskFactory. TaskFactory is a product offered by Pragmatic Works consisting of 40+ Custom SSIS components for development.

Recently I worked with a client who had an interesting business problem. This client processed documents daily for hundreds of clients and then uploaded these files to each client’s Secure FTP site. They needed to set up the Secure FTP component so that they could dynamically change the connection based on the file being processed and uploaded. In this walkthrough I will explain how the connection string for your FTP Site can be set dynamically.

  • Part 1 – Building the connection string.
  • Part 2 – Setting an expression on the TF Secure FTP Connection Manager

(Note: This tutorial is modifying the connection string of an existing Task Factory sFTP connection manager. If you want to follow along please set up a basic TF Secure FTP task and create a connection manager.)

Part 1 – Building the TF Secure FTP connection string.

There are 18 parts to the connection string for the Secure FTP connection. However for this tutorial we are only concerned with 5 of the 18 sections, we will leave the other sections set to the default settings. What are the 5 sections we are concerned with? I’m glad you asked!

  1. Connection Type
  • 1 = SFTP – SSH FTP
  • 2 = FTPS – FTP over implicit TLS or SSL
  • 3 = FTPES – FTP over explicit TLS or SSL
  • 4 = FTP
  1. Host
  2. User Name
  3. Password
  4. Port

Ok let’s get started. For this example I created 5 variables, all 5 variables have a data type of String. For demonstration purposes I hardcoded the values for each variable. For the case referenced above the client populated these variables from a SQL Table that stored the connection information.

  1. Create the five variables in the screenshot above.
  2. Add these variables to the connection string. (Connection String Text below)
  3. If you used the same variable names as this tutorial you can simply copy the connection string below. (Section A)
  4. Here is a screenshot of where we changed our connection string.
  5. I replaced the hard coded value in the connection string with ” + @[User::VariableName] + “

Section A

“ConnectionType=” + @[User::strConnectionType] + “;Host=” + @[User::strHost] + “;Port=” + @[User::strPort] + “;Username=” + @[User::strUserName] +”;Password=” + @[User::strPassword] + “;Timeout=60;DefaultRemoteDirectory=;UseProxy=False;ReuseConnection=False;ProxyType=0; ProxyHost=;ProxyPort=0;ProxyUsername=;UseBinaryTransfer=True;UsePassiveMode=True; IgnoreServerIP=True;TransferBufferSize=0;SSLVersion=2;”

Part 2 – Setting an expression on the TF Secure FTP Connection Manager

  1. Under Connection Managers highlight your FTP Connection and hit F4 to open the properties window.


  2. In the properties window highlight “Expressions” and click the ellipsis button on the right.


  3. In the Property Expressions Editor choose ConnectionString for the Property.
  4. Next click the Ellipsis on the left to open up the Expression Builder.
  5. Now copy and paste the connection string into the Expression box.


  6. Evaluate the expression to verify it works.
  7. Click ok to close the Expression Builder.
  8. Click ok again to close the Property Expressions Editor.
  9. All Done!

Conclusion: Whether you are uploading files to multiple FTP sites or just want to set the Password dynamically because it changes periodically this method will help. Thanks for looking!

Follow me on twitter! @MitchellSQL