Download Files in SSIS with an HTTP or HTTPS connection.

Recently I wanted to download historical stock information from the internet and store this information into a data warehouse. Using the Task Factory Download File Task I was able to dynamically download thousands of csv files with historical stock information and trends for my data warehouse.

The Download file task allows you to download files over an HTTP connection from inside an SSIS Package and it also has support for HTTPS, I will show you where to enter credentials.

If you want to walk through this example and don’t currently have Task Factory you can download a free 14 day trial here: Free Trial Download

Demo Time:

So in this example I am going to download a CSV File from Yahoo Finance with historical price information for Fed Ex.

  • Create a new package in SSIS and pull the Task Factory Download File Task into the control flow.
  • Now we need to create our HTTP Connection manager.
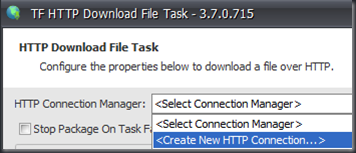
  • Inside the Download File Task select “Create New HTTP Connection…”

image

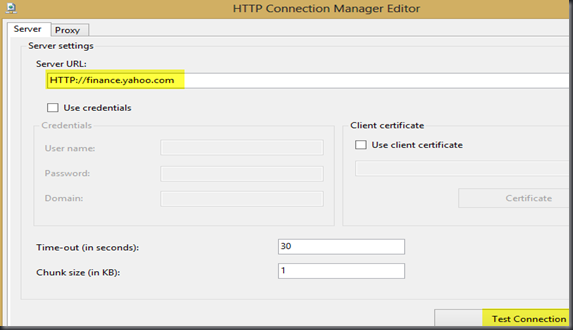
  • Creating the connection manager is very easy, especially if you are not using HTTPS.
    • Server URL: (This is the domain that is hosting the file)
    • Use Credentials: (Select this box and proceed with your username and password if credentials are required.
    • Test Connection: (Test Connection before proceeding.)
  • For Server URL I used: Http://finance.yahoo.com
  • Click Ok. Connection manager has now been created successfully.

image

  • Now we need the exact location of the file we want to download.

image

  • Now that we have the exact location of the file we can finish setting up the Download File Task.
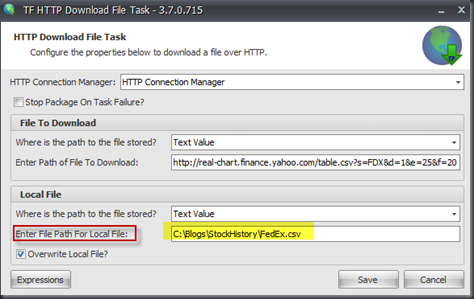
  • Paste the file location into the section “Enter Path of File To Download:”
    • Note I am simply specifying a Text Value for this walkthrough. You can use variables and expressions with this task to make it as dynamic as you need.

image

  • The final step in this process is to specify the location where the file will be stored once downloaded. Once again I am using “Text Value”.
  • “Enter File Path For Local File:” Enter the specific file location. (Screenshot)

image

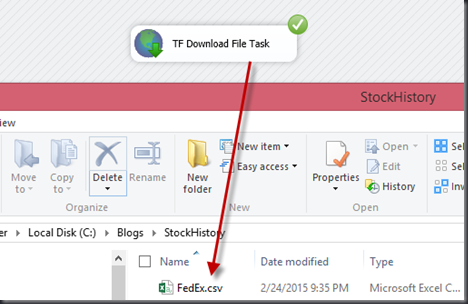
Now execute the package and there you go!

image

Thanks for Looking.
Build notification framework to send SMS Text messages and Emails in SSIS!

Of the over 40 components in Task Factory the TF Advanced Email and SMS Task is one of my favorites. In this blog I am going to discuss the rich features this task offers and provide a walkthrough of setting this task up to send an email or SMS text message upon package failure.

If you like this blog and you want to try out a free trial of Task Factory you can find it here: http://pragmaticworks.com/Products/Task-Factory/TrialDownload

Feature Highlights

  • Supports Email and SMS messages.
  • Can send emails with attachments.
  • Inbuilt HTML editor for HTML email.
  • Allows use of variables as placeholders in the Email Body so variables can be automatically replaced when an email is sent!
  • Expressions can be set on properties to make the package dynamic.

Note: We will be using SMTP connection information to set up our email connection manager. Generally a basic Bing/Google search will return the connection information required. For example Yahoo SMTP Connection info or Gmail SMTP Connection info.

Ok let’s get started with our walkthrough.

  1. Please open up a new SSIS Package.
  2. Next click on the Event Handlers tab at the top.
    1. Don’t change the executable, by default it is set at the package level.
    2. Also leave OnError for the Event Handler.

image

  1. Next click on the hyperlink “Click here to create an ‘OnError’ event handler for executable ‘<Executable Name>’.

image

  1. Now pull in the Task Factory Advanced Email and SMS task.
  2. Next we will set up a new SMTP Connection Manager.
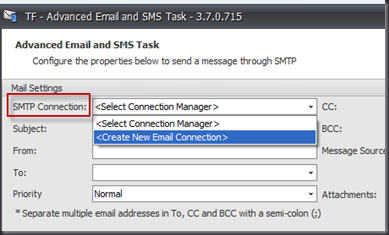
    1. Select the drop down box next to SMTP Connection and then select “Create New Email Connection”.

image

  1. On the general tab fill out the following information:
    • Protocol Type: (Must be SMTP)
    • Mail Server: (The Mail Server will differ by mail provider. I’m using Office 365 settings.)
    • User Name:
    • Password
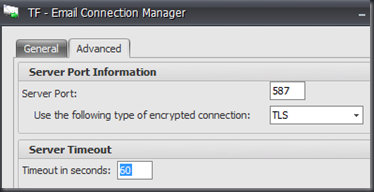
  2. On the advanced tab fill out the following:
    • Server Port: (Once again changes per mail provider)
    • Type of encrypted connection: TLS, SSL or NONE
    • Timeout in Seconds: (Default is 60)
  3. Finally test connection to validate and click ok to close.

image

image

image

Setting up SMS Providers and Emails

In this section I will demo how easy it is to set up the component to send either an SMS or Email message. Note all of this can be set up dynamically using variables and expressions!

  1. Select the dropdown for “To:” and select either email or SMS. Here I selected email and then manually entered the email address.
    • Please note you can send emails to multiple recipients by separating them with a semi colon ;.

image

  1. Ok, next let’s override our email option and select SMS.
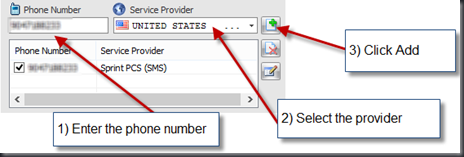
    • First enter the phone number.
    • Next select the provider (The “Provider” will be required for SMS messages.)
    • Finally select the add Icon, see screenshot below:

image

Dynamically set the body of the email and subject using expressions:

In this section we are going to use expressions for the body and subject of the email. Note that expressions can be set on virtually every property of this component.

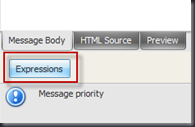
  1. Select the “Expressions” tab found at the bottom left of the TF Advanced Email editor.

image

  1. From the properties window select “Subject” from the drop down.
  2. In the “Expression” box select the Ellipsis button to open the expression editor.
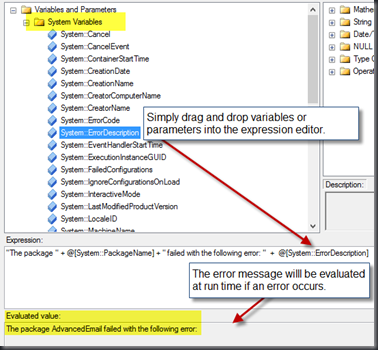
  3. Here is where we can use the SSIS Expression language and variables to make our subject dynamic at run time. (See third Screenshot below)

image

image

image

  1. Once you have completed your expression for the Subject click ok and that will close the expression editor. Now from the properties window select “Message” and once again select the Ellipsis button to open the expression editor.

image

Now when I execute the package if an OnError event happens in the package and only if this event occurs then I will receive an email or text message!

Here is the email I received upon failure of the package, pretty cool!

image

Thanks for looking!

Download Emails and Email attachments in SSIS.

Ever need to download emails and attachments using SSIS? If so you have come to right the place. Task Factory, a suite of custom SSIS components by Pragmatic Works has a component called the Email Source. The component supports both POP3 and IMAP and is really easy to set up, so let’s get started!

There is also full support for filtering messages based on sender, message to, subject, date received, body and priority.  This way you can filter down to only the messages you want to load.

If you are one of the poor unfortunate souls that don’t yet have Task Factory you can give it a try with a free trial download here: http://pragmaticworks.com/Products/Task-Factory

Walkthrough:

  1. Create a new package and bring in a data flow task.
  2. Inside the Data Flow Task pull in the TF Email Source component.
  3. Open the TF Email Source. Once open we need to create our connection manager. You can choose between POP3 or IMAP for reading emails. I prefer IMAP because it allows you to choose specifically what folder in your email you want to read from. More on this later.
  4. image
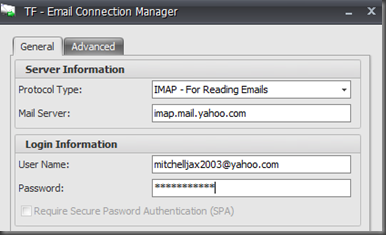
  5. On the general tab of the connection manager fill in the following items:
        1. Protocol Type
        2. Mail Server
        3. User Name
        4. Password
  6. image
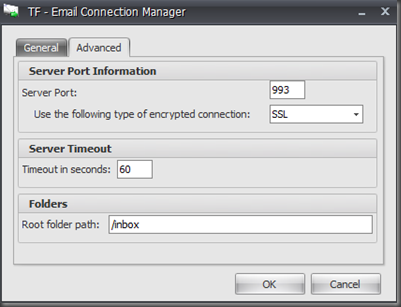
  7. On the advanced tab of the connection manager fill in the following items:
        1. Server Port
        2. Encrypted Connection
        3. Root Folder Path (Directory to read from)
  8. image
  9. Click ok to close out the connection manager.
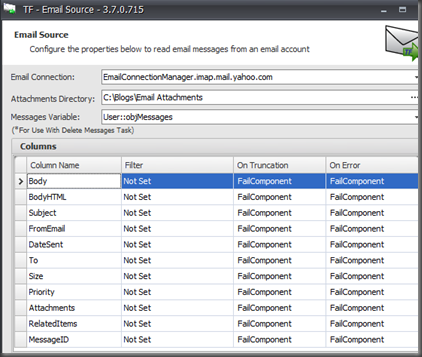
  10. Next select the location to save attachments. “Attachments Directory”
  11. I created a variable to store the message ids in. I won’t be using this object variable in this blog.
  12. Finally if we want to add a filter we can do that below as well.
  13. image
  14. Now simply connect the email source to a destination component.

Quickly encrypt and decrypt files with the TF PGP task for SSIS!

Business Problem

I recently had to help a client with encrypting a file before uploading that file to an FTP. Thanks to the PGP task in Task Factory we were able to fulfill this requirement in a matter of minutes.

Walkthrough

In this example I will walk you through quickly creating public and private keys and then using those keys to encrypt the file.

    1. Create two variables. One for the source location and one for the destination:
    2. image
    3. From the SSIS Toolbox drag and drop the PGP Task into the control flow and then open it for editing.
    4. For “What action will this perform?” choose Encrypt File.
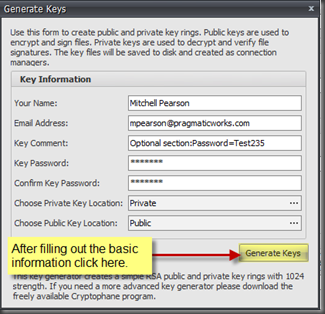
    5. Click Generate Key to create your own public and private keys. Note: Public keys are used for encryption and private keys are used for decryption.
    6. image
    7. Now to fill out some basic information. The private key created will require a password, please remember to store this password somewhere safe, i.e. some kind of password vault. This will be required to decrypt files.
    8. image
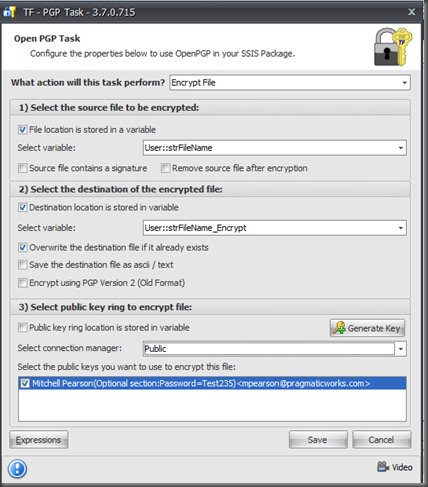
    9. Now that we have generated PGP keys we can now encrypt our files in just a couple steps. A screenshot of all steps below is listed at the bottom.
    10. For Section 1:
      1. Select “File location is stored in a variable”
      2. Select “strFileName” for the variable
    11. Section 2:
      1. Select “Destination location is stored in a variable”
      2. Select “strFileName_Encrypt” for the variable.
      3. Select the checkbox for Overwrite the destination file if it already exists
    12. Section 3:
      1. Select connection manager: Select “Public”.
        1. Note: The connection manager “Public” was added to the package automatically when we generated new keys. Public is the name I gave to my public key ring.
      2. Finally select the Public Key you wish to use for encryption. We only have one key on our key ring.

I have provided three screenshots below.

    1. Screenshot 1 – Final Configuration
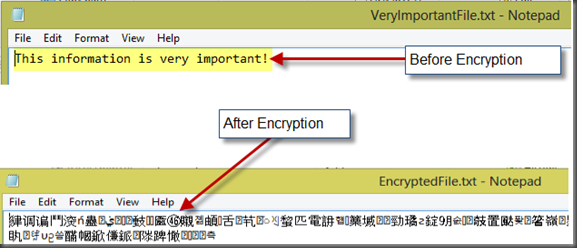
    2. Screenshot 2 – File before PGP Encryption
    3. Screenshot 3 – File after PGP Encryption

Screenshot of final configuration:

image


image


As always thanks for looking and your feedback is appreciated!

Get a List of Files on an FTP Server and then process with Foreach Loop Container

Today we are going to address a very common FTP question: “How can I get a list of the files that are on my FTP Server?”

This is a task that can be accomplished very easily with the Task Factory Secure FTP component and this walk through will provide step by step directions. If you are interested in Task Factory and the more than 40 tasks you can find the free trial here:

Here we will use the “Get list of files” option and store all the files for a given directory into an object variable. We will use a Foreach loop container to iterate through the object variable and then an Execute SQL task to write each file name to a table in our database. This walkthrough is broken down into three sections.

  • Part 1 – Setting up the Secure FTP component to get List of Files
  • Part 2 – Setting up the For Each Loop to read the the object variable
  • Part 3 – (Optional) Setting up the Execute SQL Task to write the file names to a table.

Part 1 – Configuring the Secure FTP site to Get List of Files from server.

  1. Start a new package and drag the Secure FTP task into your control flow from the toolbox.
  2. Next right click on the Secure FTP Task and click edit.
  3. Steps 4-7 below are in screenshot 1
  4. What will this task do? Select “Get list of files” from the drop down menu.
  5. For SFTP Connection Manager either choose an existing connection manager or create a new one if don’t have one set up.
  6. For your Directory location on server you have two options:
    1. First you can choose to click the ellipsis button and hard code the directory location.
    2. Second you can choose to store the directory location in a variable
  7. Next create an object variable to store the list of file names in from the server. (objFilesList)

Screenshot 1

Part 2 – Configuring the For Each Loop to iterate through the object variable

  1. Pull a Foreach Loop container into the Control Flow and drag the precedence constraint from the Secure FTP task to the Foreach loop container.
  2. Steps 3-6 can be found in Screenshot 2
  3. Open the For Each container and click on the Collection tab.
  4. For “Enumerator” choose “Foreach From Variable Enumerator” from the drop down.
  5. Next select the object variable you specified in the Secure FTP component. (objFilesList)
  6. Finally click the Variable Mappings tab.

Screenshot 2

  1. On the Variable Mappings tab select a string variable to store the file name in. (strFileName)
  2. Make sure Index is set to 0. (Screenshot 3)
  3. Click Ok.

Screenshot 3

Optional: (This section simply shows how to map variables in an Execute SQL Task and helps with visualization of each iteration of the Foreach Loop through the list of files on our FTP.)

Part 3 – Setting up the Execute SQL Task to read the string variable

(This section has been added for completeness and is fully optional.)

Note: For this example I have created a simple table with four columns:

CREATE TABLE [dbo].[FilesOnSftp](

[ID] [int] IDENTITY(1,1) NOT NULL,

[Directory] [varchar](50) NULL,

[FileName] [varchar](50) NULL,

[DateLoaded] [date] NULL)

  1. Pull an Execute SQL Task from the toolbox into the Foreach Loop container.
  2. Create a new variable called strSftpDirectory and give it a value of /

  3. Right click on the Execute SQL Task and click Edit to bring up the Editor
  4. For “Connection” choose the connection manager to your database.
  5. Click and highlight “SQLStatement” and then click the Ellipsis button that appears on the right.

Screenshot 4

  1. Clicking the Ellipsis button will give you a pop up window, this is where we enter our Insert SQL Statement. Here is the syntax I used if you are following along with the tutorial:

    INSERT INTO dbo.FilesOnSftp

([Directory], [FileName], [DateLoaded])

VALUES(?, ?,GETDATE())

  1. Now its time to map the parameters. Click on the Parameter Mapping tab. (Screenshot 5)
  2. Click the Add button and then select “strSftpDirectory” for Variable Name.
  3. For data type choose Varchar and change the Parameter Name to 0.
  4. Click the Add button a second time and select strFileName for the Variable Name.
  5. For data type choose Varchar and change the Parameter Name to 1. Click ok to save changes.

    Screenshot 5

Quickly remove invalid XML characters! (Dimension Processing Error: Illegal XML Character)

Recently I was using the Dimension Processing task inside of SSIS to perform a process add to one of my dimensions. I then found out that I had some bad data, more specifically, I had some invalid XML characters in my source data and this was causing the dimension processing task to fail. Below is a screenshot that includes the invalid character, after Mitchell before =.

image

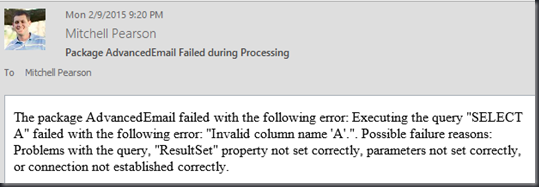
Error Message:

image

Business Problem:

I needed to remove invalid XML characters from source data so that I could use the dimension processing task to perform a process add on the dimension.

Solution:

Sadly, I originally began this process by trying to write my own script transform to remove the invalid XML characters. Unfortunately the script I was using (Found on the internet) apparently did not account for all characters as my processing task continued to fail with the same error.

So what did I do? I turned to Task Factory of course! To solve this problem I used the Task Factory replace unwanted characters transform.

Walkthrough:

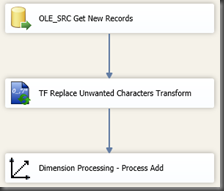
    1. Bring the Task Factory Replace Unwanted Characters Transform into your data flow and place it between your source and destination:
    2. image
    3. Next open up the Task Factory component and you will see a list of your columns on the left.
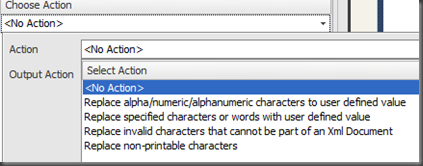
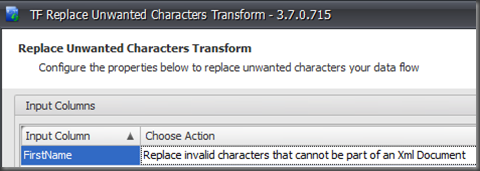
    4. On the right you will see the column “Choose Action”. Click this drop down menu for the column you wish to cleanse. This menu will provide you with 4 different cleansing actions! (List below)
      1. image
    5. Select “Replace invalid characters that cannot be part of an XML Document.

image

Conclusion:

Now when I execute my package you will notice the illegal XML character is gone!

image

Thank you Task Factory Team!

Remove unwanted characters in SSIS with Task Factory!

Recently I was tasked with removing special characters that randomly showed up in one column of a data set, these characters were coming from a proprietary source. The characters were the hash tag (#) and semi-colon (;). One or both characters would appear at the beginning, end or middle of the column. There are a few different ways you could deal with this type of situation, each of them varying in their degree of complexity and difficulty.

Fortunately for the customer we provided a very easy and quick solution. In this short blog we are going to take a look at the Data Cleansing transform offered in Task Factory. First let’s take a look at a before and after picture so you can visualize the data and end result.

Setting up the component

  1. Pull the Task Factory Data Cleansing Transform into your Data Flow.
  2. Connect your source data to the Data Cleansing transform.
  3. Right click on the Data Cleansing Transform and click Edit.
  4. First select the column you would like to “Replace”.
  5. Next select Replace Specified characters or words with user defined value. (Screenshot 1)

  6. After you select an action you will receive a parameter box where you can specify the characters you would like to replace and what you want to replace them with.

  7. Now we will finish configuring the rest of the component. Please see screenshot below for final settings.

  8. Finally click ok to save your settings and execute the package!

Conclusion:

That’s it. I tried to drag it out as much as I could but some things are just that simple. Take a look at some of the other actions included and enjoy! As always thanks for looking.

How to solve a a tricky SSIS Problem with the TF Surrogate Key transform!

Recently I was able to solve a really tricky problem in SSIS using the TF Surrogate key transform. Let’s discuss the business problem:

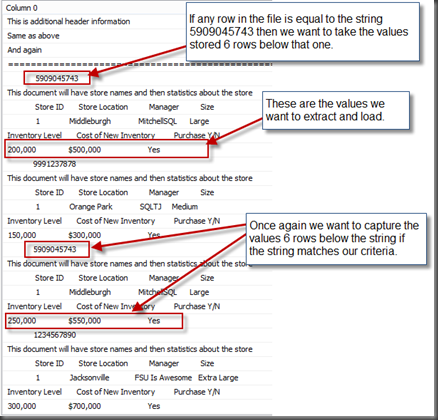
The client was using some complicated .net code to loop through each line in a file and look for a very specific string of code. Once the string was found they then wanted to return all the values found six rows below that row. This process continues through the file. A picture is worth a thousand words:

image

So now that we understand the business problem we can solve this with SSIS. The solution is actually quite simple. Essentially we need to get the string we are searching for (5909045743) and the row with the values on the same row so we can let SSIS work its’ magic. This is where the Surrogate Key transform comes in.

To solve this problem I used not one but two Flat File source components in my data flow and I brought the same file in twice. I then used the surrogate key transform to assign row numbers to the rows coming from each flat file source component.

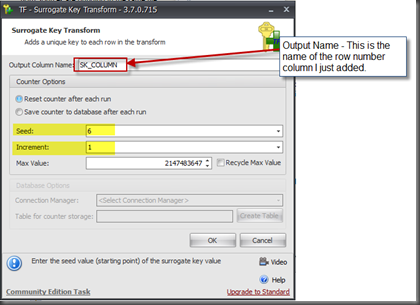
  • For the first flat file source I started the row number at 6 and then incremented by one.
  • For the second flat file source I started the row number at 1 and incremented by one.
  • Setting up the surrogate key transform is extremely easy, 3 easy steps, see below:

image

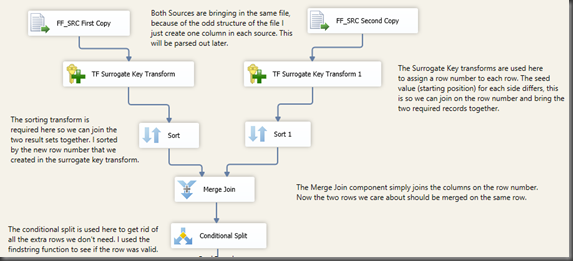
Now I use the merge join component in SSIS and join the two data sets on the newly created SK_Columns. This will put our search string on the same row with the values we were looking for.

Below is a picture of the data flow thus far:

image

And here is a screenshot of the new result set after the Merge Join transform, notice how the two rows are now on the same row. From here we can do some basic SSIS operations to split out all the records we don’t need and then we can use a derived column transform to parse out the values in “Column 2”.

image

Thanks for looking!

Create efficient Range Lookups with the Task Factory Advanced Lookup Transform

There are three generally accepted methods to perform the tricky range lookup in SSIS. A great blog post that outlines all three of these methods and how they perform can be found here. Per the post the best performing solution is unfortunately the one that is arguably the most difficult to set up. Fortunately for us we can get all the performance of scripting without all the work!

Scenario:

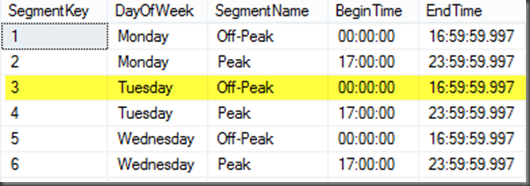
We need to perform a lookup to the segment table based on the Weekday and Time that the transaction took place. For example, assume we had a transaction take place on Tuesday at 15:30:00. This transaction would need to be mapped to the SegmentKey of 3. Screenshot of segment table below:

image

Now that we have identified our business requirement, let’s look at how we can use the Advanced Lookup Transform in Task Factory to solve this tricky problem.

  1. For this example we will need two data flow tasks.
    1. The first data flow task will load our segment table into the TF ADV Lookup Cache Transform.
      1. Inside the first data flow task I bring in an OLEDB Source and select my Segment table.
      2. Next I bring in the TF Advanced Lookup Cache transform and connect the two transforms. (Screenshot 1)

image

      1. Open the TF Cache transform and select “Create New Lookup Cache Transform” (Screenshot 2)

image

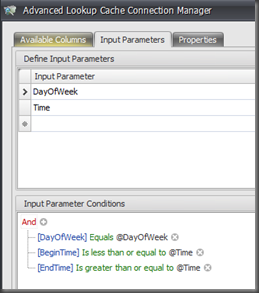
      1. Click the Input Parameter tab at the top. We are going to add two parameters, one for day and one for the time of the actual transaction. In the bottom dialog box we are going to define our conditions for when a lookup should occur. For this example we have three criteria.
        1. First the day of the transaction must equal the day in the Segment table.
        2. Second the begin time must be less than or equal to the time of the transaction.
        3. Finally the end time must be greater than or equal to the time of the transaction.

image

      1. Once the criteria have been entered click ok twice to close out of the cache connection manager.
      2. Now in our second data flow we will pull in our transactional data and perform our lookup. For this example I have written a simple select statement to simulate a transaction.
        SELECT 'Tuesday' AS DayOfWeek, '15:30:00' AS TIME
      3. Now that the source has been set up we need to bring in the TF Advanced Lookup Transform and open it for editing.
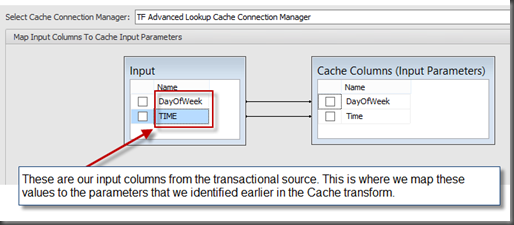
      4. Select our Cache Connection manager from the drop down and then map our input columns to our input parameters. Screenshot below.

image

      1. Now execute the package!

image

Thanks for looking.

Dynamically set secure FTP connection string and password

Note: This walkthrough is specific to the Secure FTP component available in TaskFactory. TaskFactory is a product offered by Pragmatic Works consisting of 40+ Custom SSIS components for development.

Recently I worked with a client who had an interesting business problem. This client processed documents daily for hundreds of clients and then uploaded these files to each client’s Secure FTP site. They needed to set up the Secure FTP component so that they could dynamically change the connection based on the file being processed and uploaded. In this walkthrough I will explain how the connection string for your FTP Site can be set dynamically.

  • Part 1 – Building the connection string.
  • Part 2 – Setting an expression on the TF Secure FTP Connection Manager

(Note: This tutorial is modifying the connection string of an existing Task Factory sFTP connection manager. If you want to follow along please set up a basic TF Secure FTP task and create a connection manager.)

Part 1 – Building the TF Secure FTP connection string.
There are 18 parts to the connection string for the Secure FTP connection. However for this tutorial we are only concerned with 5 of the 18 sections, we will leave the other sections set to the default settings. What are the 5 sections we are concerned with? I’m glad you asked!

  1. Connection Type
  • 1 = SFTP – SSH FTP
  • 2 = FTPS – FTP over implicit TLS or SSL
  • 3 = FTPES – FTP over explicit TLS or SSL
  • 4 = FTP
  1. Host
  2. User Name
  3. Password
  4. Port

Ok let’s get started. For this example I created 5 variables, all 5 variables have a data type of String. For demonstration purposes I hardcoded the values for each variable. For the case referenced above the client populated these variables from a SQL Table that stored the connection information.
  1. Create the five variables in the screenshot above.
  2. Add these variables to the connection string. (Connection String Text below)
  3. If you used the same variable names as this tutorial you can simply copy the connection string below. (Section A)
  4. Here is a screenshot of where we changed our connection string.
  5. I replaced the hard coded value in the connection string with ” + @[User::VariableName] + “

Section A

“ConnectionType=” + @[User::strConnectionType] + “;Host=” + @[User::strHost] + “;Port=” + @[User::strPort] + “;Username=” + @[User::strUserName] +”;Password=” + @[User::strPassword] + “;Timeout=60;DefaultRemoteDirectory=;UseProxy=False;ReuseConnection=False;ProxyType=0; ProxyHost=;ProxyPort=0;ProxyUsername=;UseBinaryTransfer=True;UsePassiveMode=True; IgnoreServerIP=True;TransferBufferSize=0;SSLVersion=2;”

Part 2 – Setting an expression on the TF Secure FTP Connection Manager

  1. Under Connection Managers highlight your FTP Connection and hit F4 to open the properties window.


  2. In the properties window highlight “Expressions” and click the ellipsis button on the right.


  3. In the Property Expressions Editor choose ConnectionString for the Property.
  4. Next click the Ellipsis on the left to open up the Expression Builder.
  5. Now copy and paste the connection string into the Expression box.


  6. Evaluate the expression to verify it works.
  7. Click ok to close the Expression Builder.
  8. Click ok again to close the Property Expressions Editor.
  9. All Done!

Conclusion: Whether you are uploading files to multiple FTP sites or just want to set the Password dynamically because it changes periodically this method will help. Thanks for looking!

Follow me on twitter! @MitchellSQL